Red-Green Machine sklidila úspěch, ale jejím omezením bylo možnost použití jen lidmi v dosahu. Nedostatek jsem chtěl odstranit možností ovládání přes webový prohlížeč.
1. Nové obzory
Na Arduinu jsem už webový server používal. Jeho implementace je jednoduchá. S čím jsem, ale neměl zkušenost bylo připojení přez WiFi. Všechny projekty používaly Mini Ethernet modul HanRun s cenou kolem 100,- Kč. Cena Wifi shieldu se pohybuje kolem 300,- Kč.
Vzpomněl jsem si, že mi kamarád vyprávěl o použití NodeMCU pro snímání a odesílání teploty. Deska umožňuje programování v Lua nebo v kódu pro Android. A to nejlepší na závěr je její cena, včetně WiFi modulu, kolem 80,- Kč.
Další zajímavá komponenta, na kterou jsem narazil je mini Mp3 přehrávač DFPlayer mini s 3W zesilovačem a slotem pro SD kartu za cenu 50,- Kč.
Nějak mimochodem jsem přišel na existenci PullUp rezistorů 20k zabudovaných přímo v Atmega čipech. Takže odpadá nutnost rezistorů pro tlačítka. Jejich použití je jednoduché.
pinMode(PIN_RED, INPUT_PULLUP);
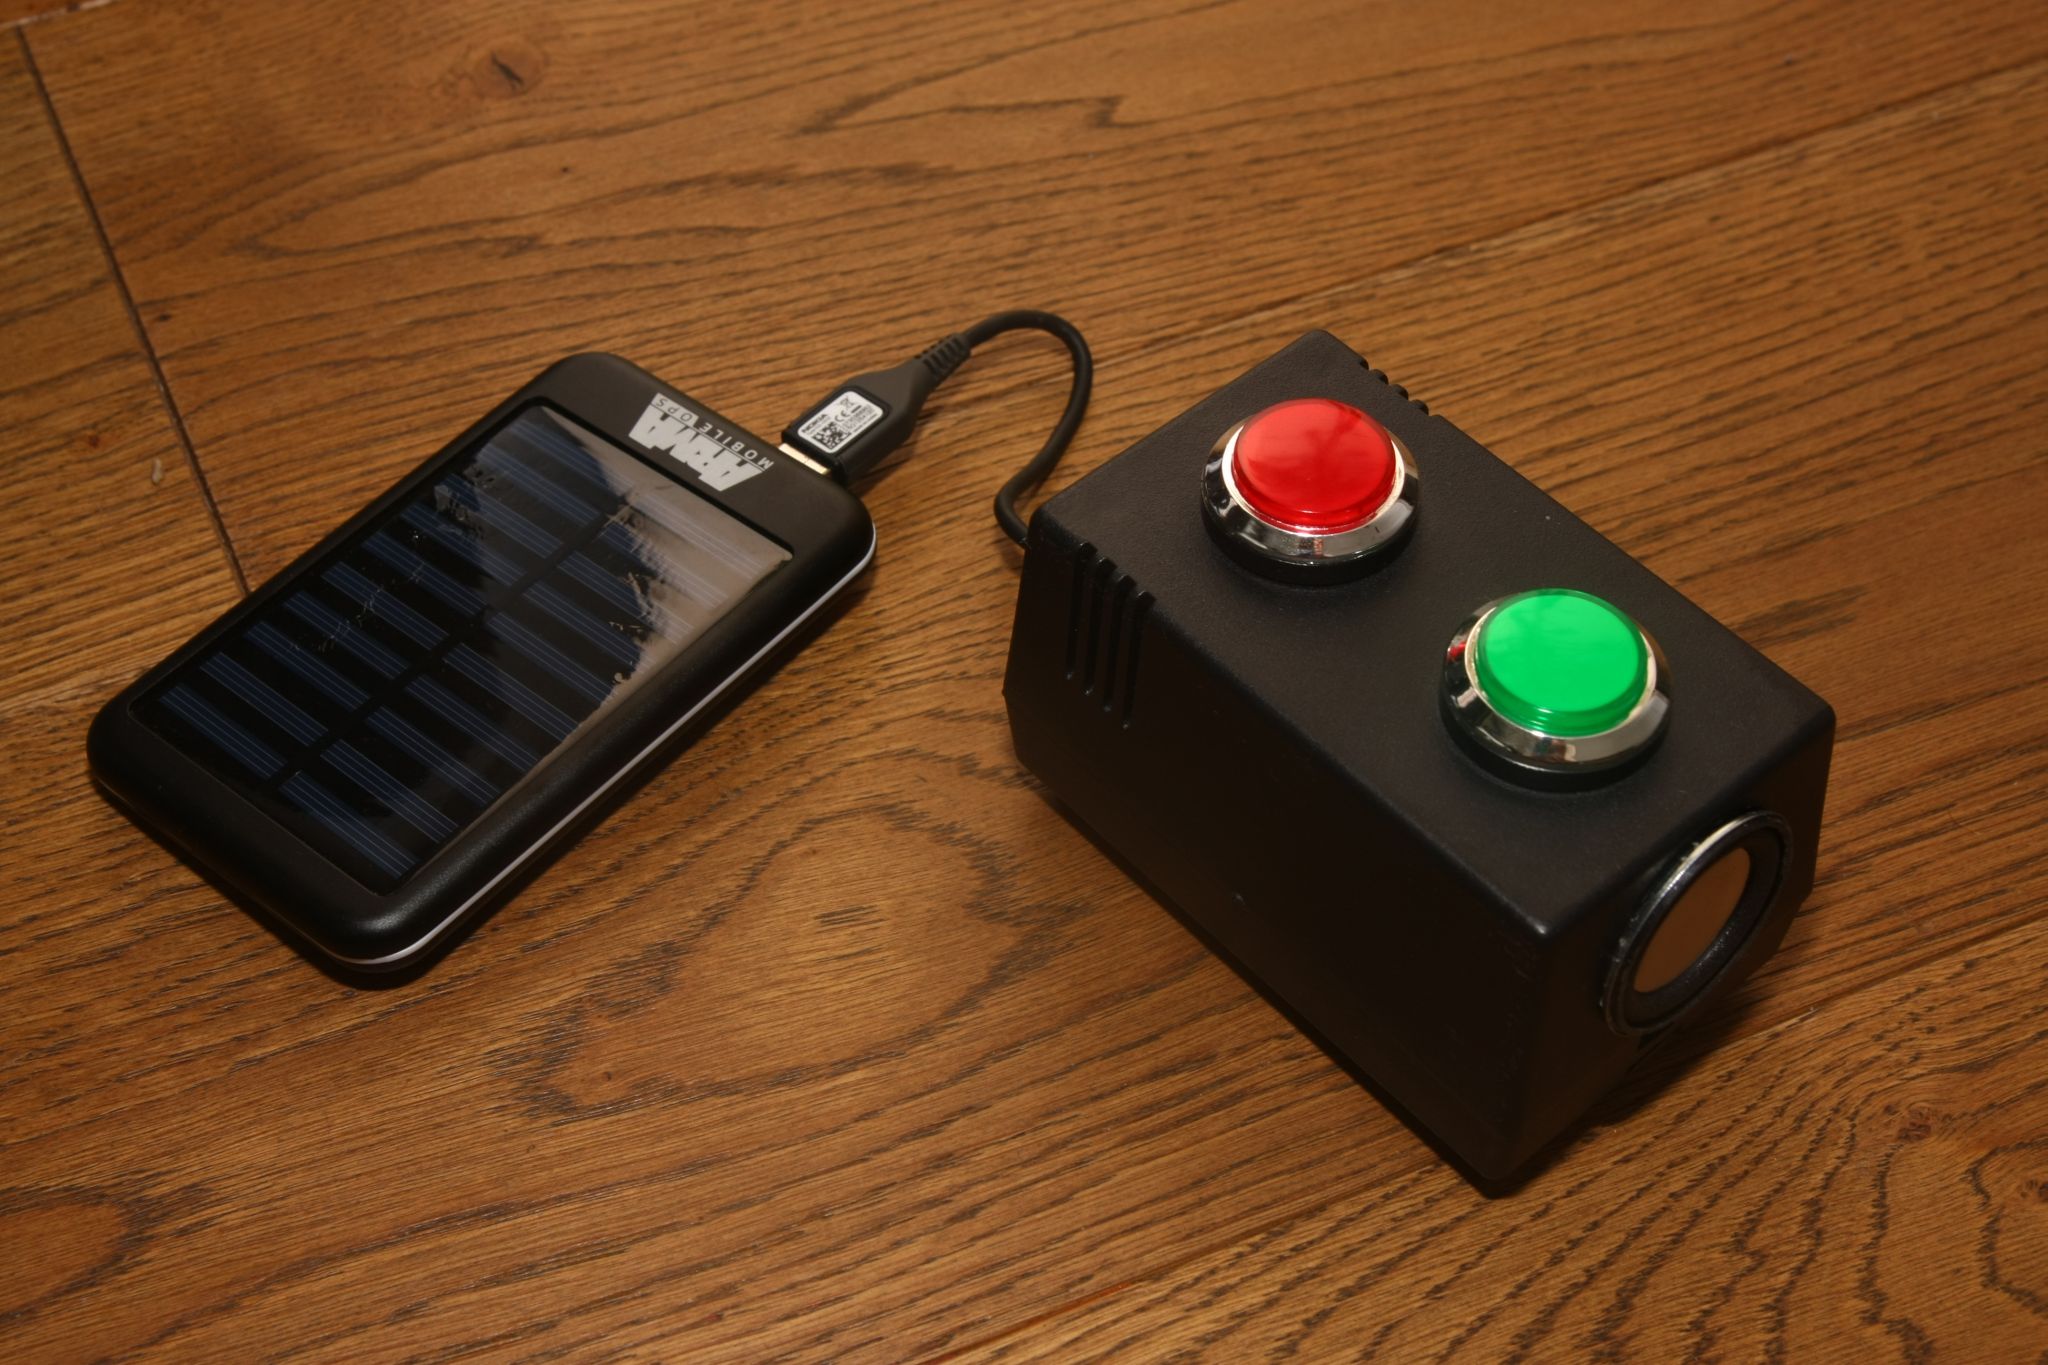
2. Komponenty
- krabička KPZ5 (Z16) 63x70x114
- reproduktor 4ohm 3W
- Mini Mp3 Player module
- NodeMcu s WiFI
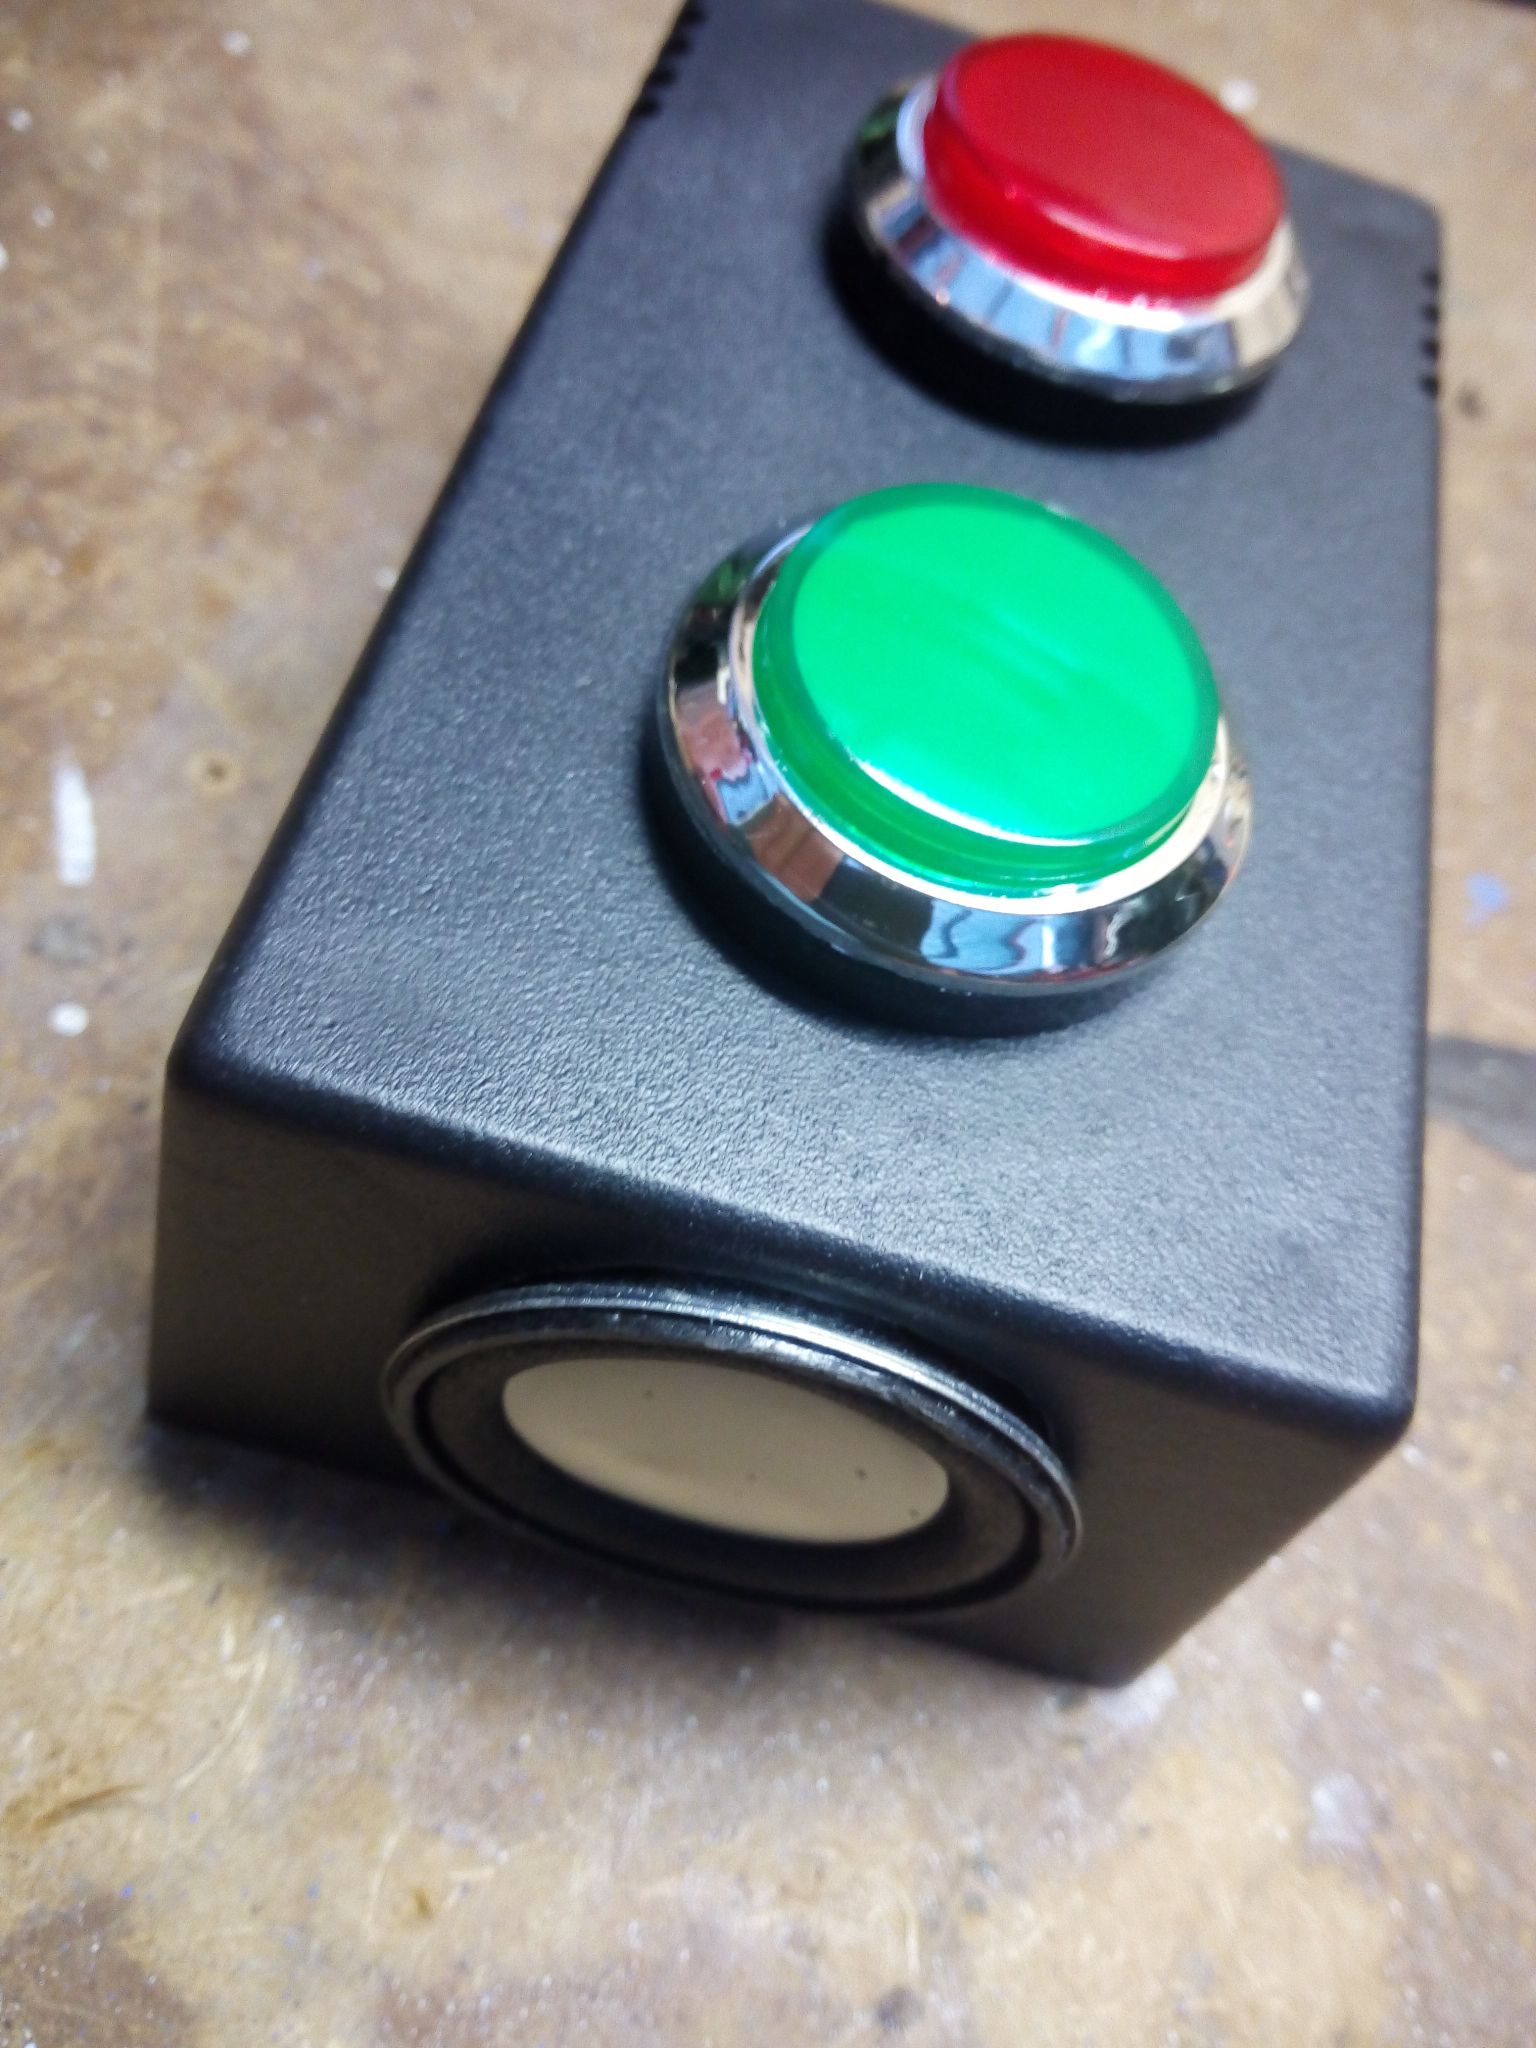
- dvě arkádová tlačítka s podsvícením
- 2x odpor 220Ohm
- SD karta
- micro USB kabel
3. Jak to funguje
Na kartě jsou dva adresáře „00“ pro red hlášky a „01“ pro green hlášky. V každém jsou uloženy zvukové soubory s 4 místným číselným prefixem. Soubory jsou ve formátu wav 16Hz, 8bit mono. Při stisku tlačítka se náhodně vybere jeden ze souborů ve zvoleném adresáři a přehraje se.
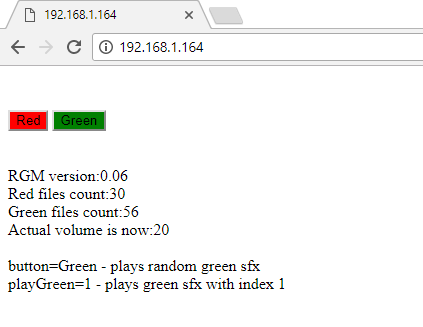
Po přihlášení do WiFi sítě, získáme IP adresu RedGreenMachine a tu zadáme do webového prohlížeče. Načte se nám jednoduchá stránka s popisem a virtuálními red a green tlačítky.
Pro zelené tlačítko jsou použity superlativy z Apple KeyNote a pro červené tlačítko „Lakatoš“.
4. Krabička


Do horního dílu krabičky si pro tlačítka a reproduktor vyvrtáme díry.
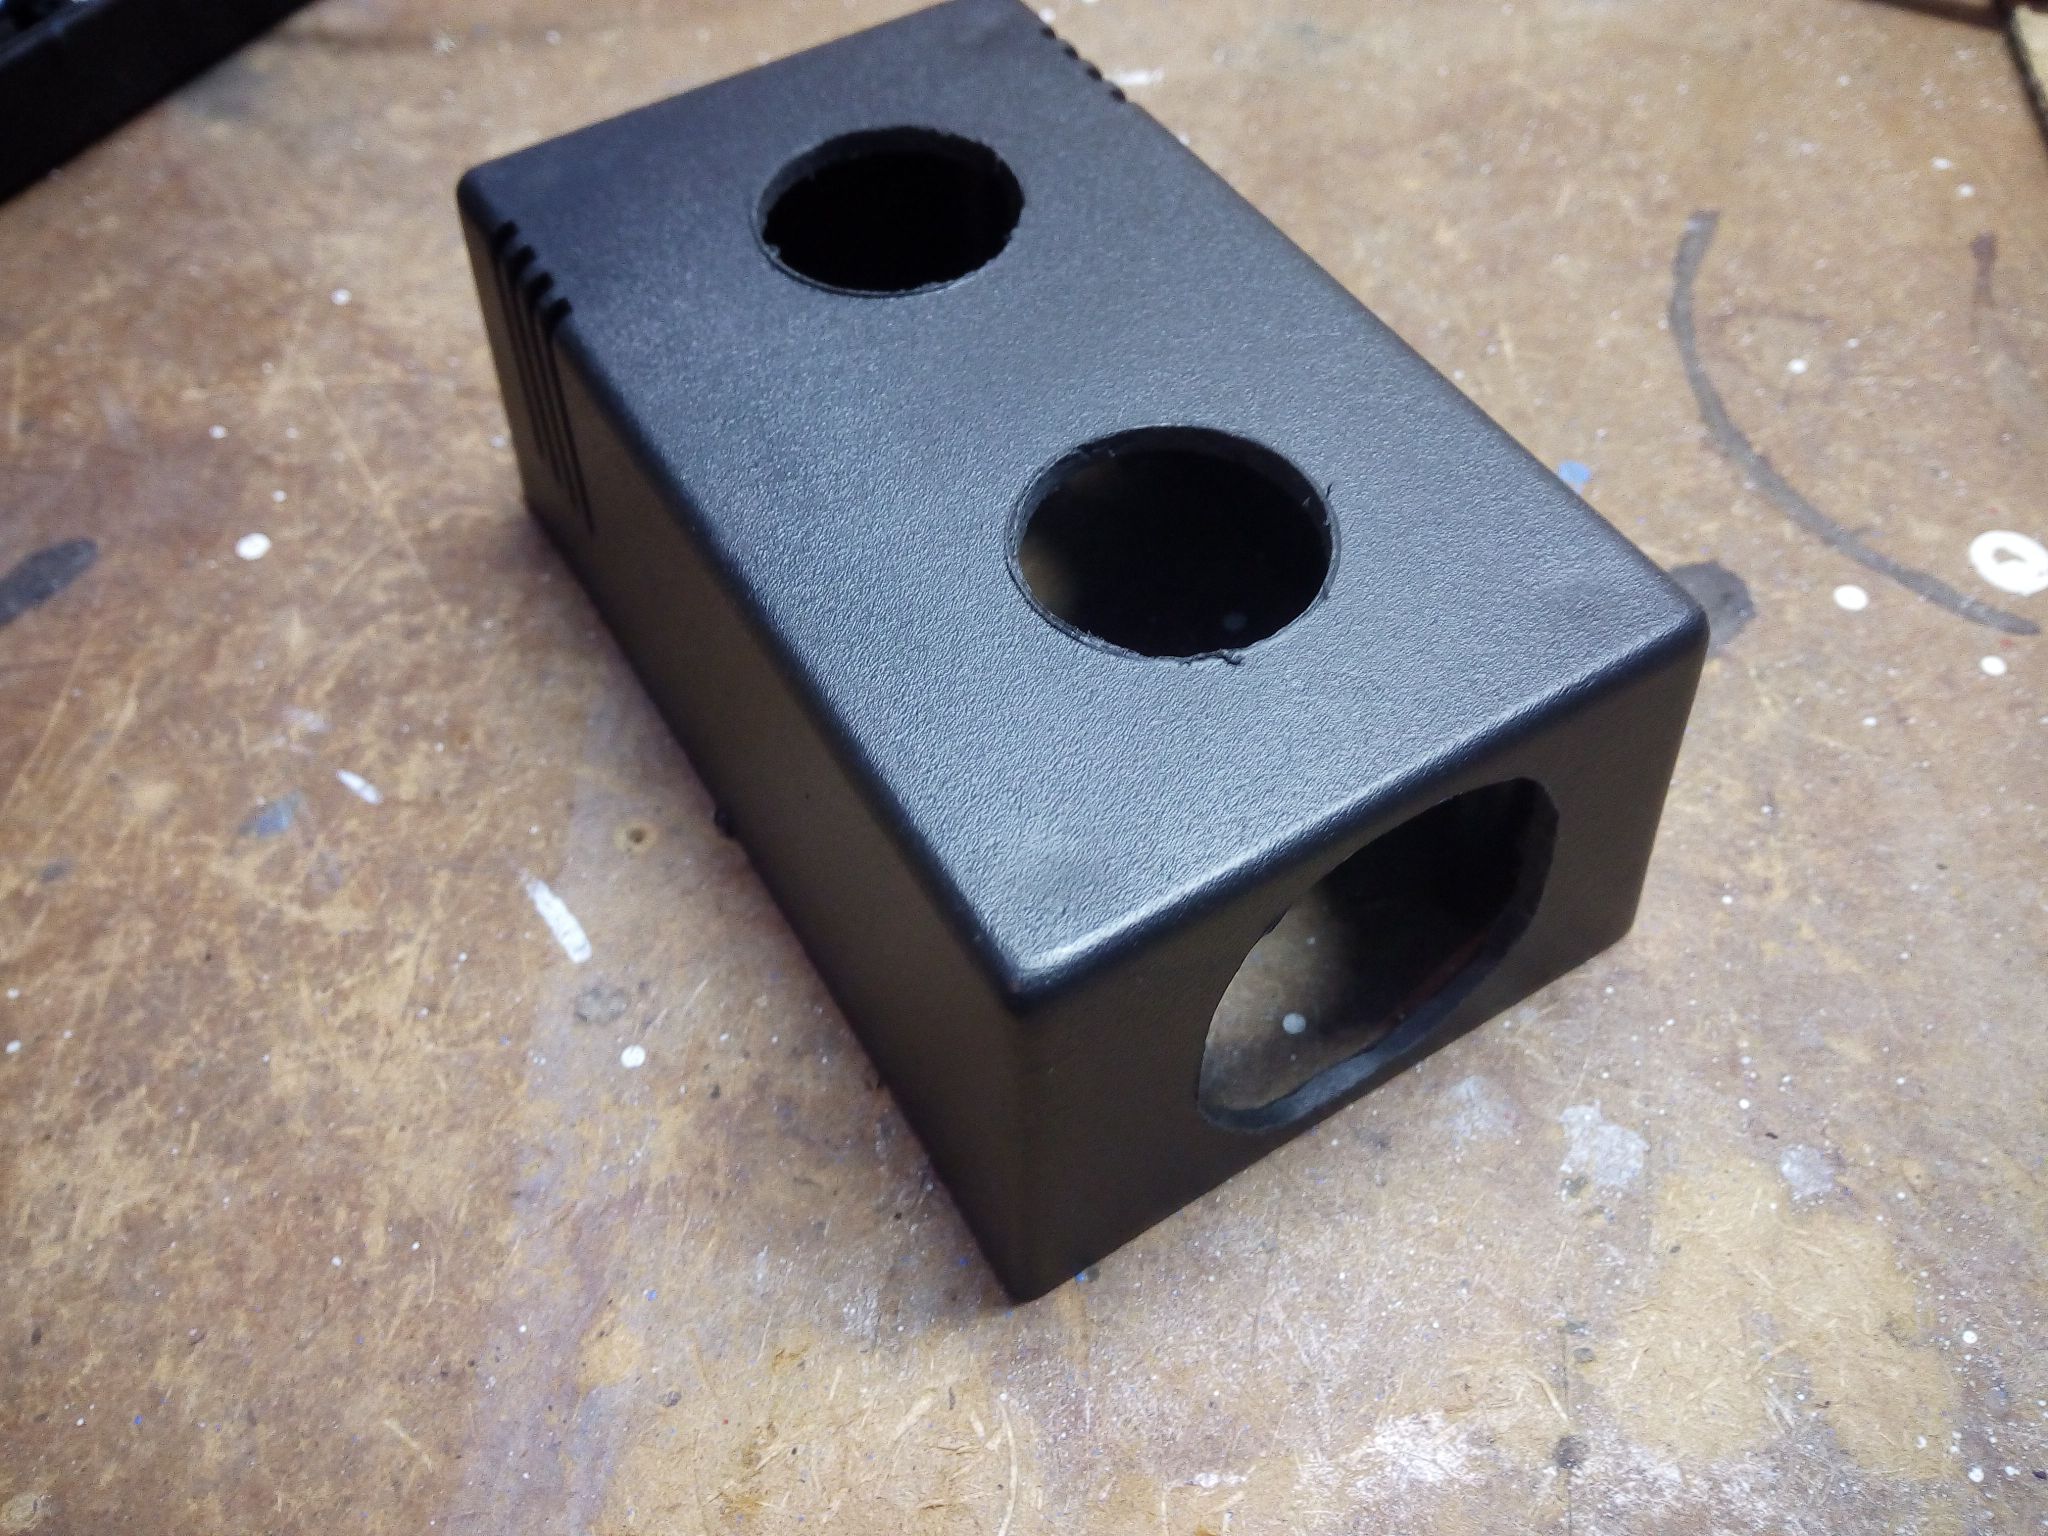
Díry pečlivě začistíme pilníkem. Do spodního dílu, si pod díru pro reproduktor vybrousíme štěrbinu pro vložení micro SD karty.

Reproduktor vlepíme pomocí tavné pistole. Tlačítka přišroubujeme maticemi.
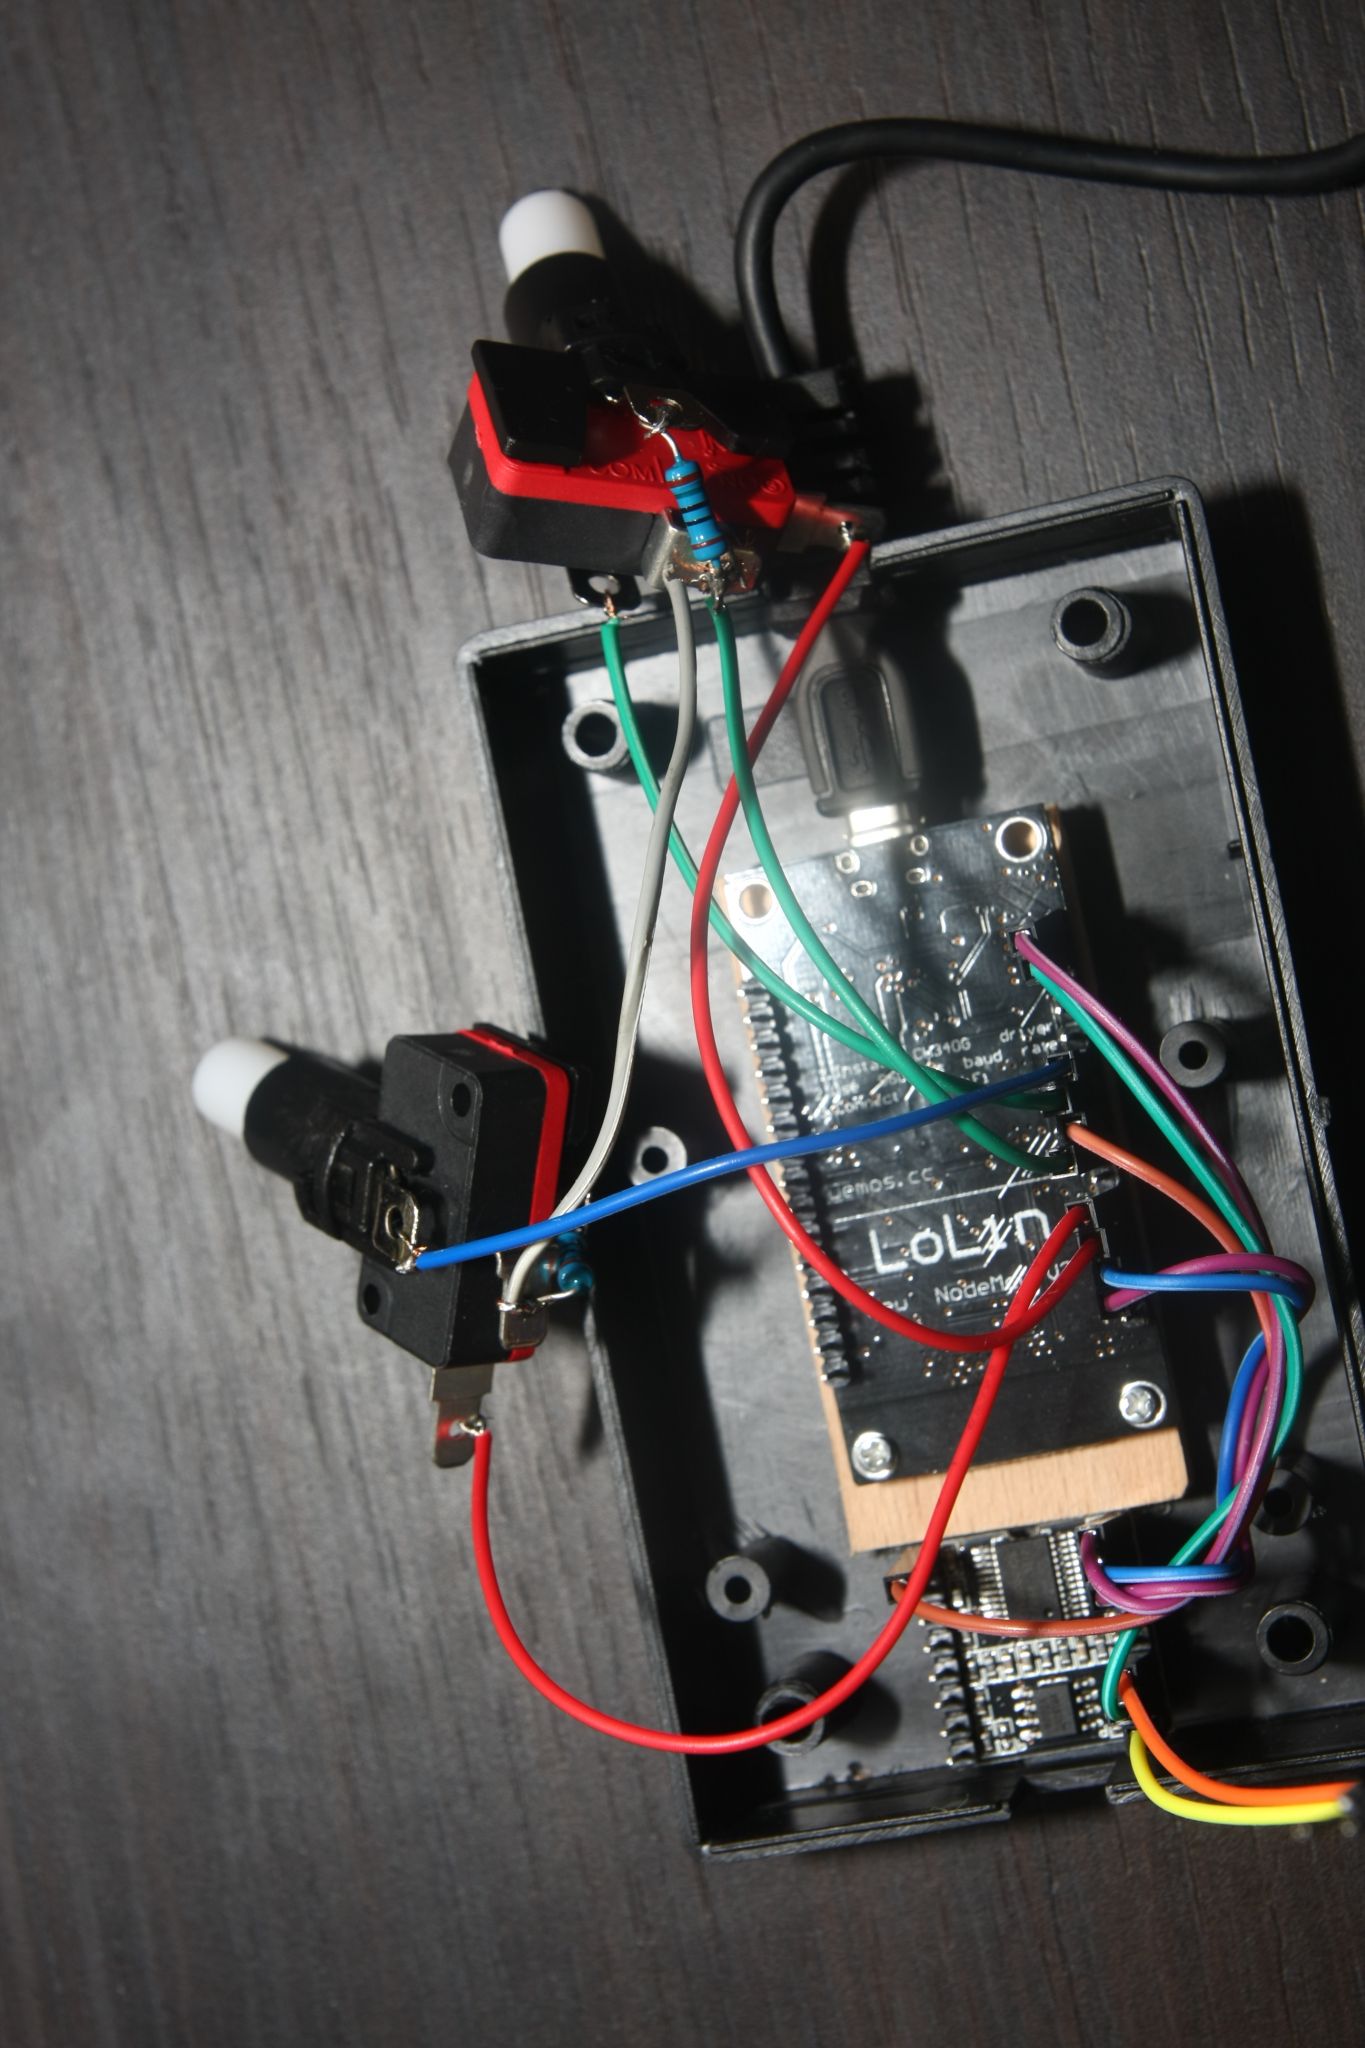
5. Instalace NodeMcu a Mp3
Abychom vyrovnali výšku mezi vstupem pro kabel a konektorem NodeMcu, tak desku podložíme 5 mm překližkou, kterou přilepíme tavnou pistolí. Překližku zároveň použijeme k zajištění Mp3 přehrávače u štěrbiny pro micro SD kartu. Mp3 modul pro jistotu ještě přilepíme ke spodnímu dílu krabičky. Dáváme pozor, ať nezalepíme SD slot.

K NodeMcu připojíme tlačítka a k Mp3 modulu reproduktor. Ledky tlačítek připojíme přes odpory 220Ohm.

6. Program
#include <ESP8266WiFi.h>
#include <SoftwareSerial.h>
#include <DFPlayer_Mini_Mp3.h>

#define VERSION 0.06
// 0.06 - Not required Wifi connection
// 0.05 - Support for leds.
// 0.04 - Support for buttons, show info on webpage
// 0.03 - Support for volume and specific file playing
// 0.02 - Mp3 modul test
// 0.01 - Web test

#define PIN_RED D3
#define PIN_GREEN D4
#define PIN_BUSY D5
#define PIN_RED_LED D6
#define PIN_GREEN_LED D7

#define RED_FOLDER_NUMBER 0//folder name is 00
#define GREEN_FOLDER_NUMBER 1//folder name is 01

#define DELAY_BETWEEN_WIFI_RECONNECTION 6000//in ms

const char* ssid = "";//wifi SSID name
const char* password = "";//wifi password

int mp3Volume = 20;//default volume
int redFileCount = 0;//file count in directory 00 - red
int greenFileCount = 0;//file count in directory 01 - green

bool wifiConnected = false;
uint32_t timeToTryConnectToWifi;

WiFiServer server(80);//server will run on port 80
SoftwareSerial mp3Serial(D1, D2);// RX, TX

void setup()
{
  Serial.begin(115200);
  delay(10);

  connectToWifi(30);

  //set software serial
  mp3Serial.begin(9600);

  //set mp3 player
  pinMode(PIN_BUSY, INPUT);

  mp3_set_serial(mp3Serial);
  mp3_set_debug_serial(Serial);

  // Delay is required before accessing player. From my experience it's ~1 sec
  delay(1000);

  mp3_set_volume(mp3Volume);//0 - 30
  mp3_set_device(2);//set source SD card

  //read file counts
  mp3_get_folder_sum(RED_FOLDER_NUMBER);
  redFileCount = mp3_wait_folder_sum();

  Serial.print("redFileCount:");
  Serial.println(redFileCount);

  mp3_get_folder_sum(GREEN_FOLDER_NUMBER);
  greenFileCount = mp3_wait_folder_sum();

  Serial.print("greenFileCount:");
  Serial.println(greenFileCount);

  //prepare buttons
  pinMode(PIN_RED, INPUT_PULLUP);
  pinMode(PIN_GREEN, INPUT_PULLUP);

  //prepare leds
  pinMode(PIN_RED_LED, OUTPUT);
  pinMode(PIN_GREEN_LED, OUTPUT);

  randomSeed(analogRead(0));//initialize random generator from analog input
}

void loop()
{
  checkButtonsState();
  checkWebServerStatus();
}

// Try connect to wifi and start server
void connectToWifi(int maxTry)
{
  // Connect to WiFi network
  Serial.println();
  Serial.print("Connecting to ");
  Serial.println(ssid);

  WiFi.begin(ssid, password);

  int wifiConnectionTryCount = 0;
  while (WiFi.status() != WL_CONNECTED && wifiConnectionTryCount < maxTry)
  {
    delay(500);
    Serial.print(".");
    wifiConnectionTryCount++;
  }

  //set flag according to wifi status
  wifiConnected = WiFi.status() == WL_CONNECTED;

  if (wifiConnected)
  {
    Serial.println("WiFi connected");

    // Start the server
    server.begin();
    Serial.println("Server started");

    // Print the IP address
    Serial.print("Use this URL to connect: ");
    Serial.print("http://");
    Serial.print(WiFi.localIP());
    Serial.println("/");
  }
  else
  {
    Serial.println("WiFi not connected");
  }
}

// Test if some button is pressed
void checkButtonsState()
{
  int buttonState = digitalRead(PIN_RED);
  if (buttonState == LOW)
  {
    Serial.print("Red button:");
    Serial.println(" pressed");

    digitalWrite(PIN_RED_LED, HIGH);
    playRandom(RED_FOLDER_NUMBER, redFileCount);
  }
  else
  {
    digitalWrite(PIN_RED_LED, LOW);
  }

  buttonState = digitalRead(PIN_GREEN);
  if (buttonState == LOW)
  {
    Serial.print("Green button:");
    Serial.println(" pressed");

    digitalWrite(PIN_GREEN_LED, HIGH);
    playRandom(GREEN_FOLDER_NUMBER, greenFileCount);
  }
  else
  {
    digitalWrite(PIN_GREEN_LED, LOW);
  }
}

// Test if some web request is available
void checkWebServerStatus()
{
  if (!wifiConnected)
  {
    uint32_t nowTime = millis();

    //check time to try connect to wifi
    if (nowTime > timeToTryConnectToWifi)
    {
      connectToWifi(20);

      timeToTryConnectToWifi = nowTime + DELAY_BETWEEN_WIFI_RECONNECTION;
    }

    //check last status
    if (!wifiConnected)
    {
      return;
    }
  }

// Check if a client has connected
  WiFiClient client = server.available();
  if (!client)
  {
    return;
  }

  int waitCounter = 0;

  // Wait until the client sends some data
  Serial.println("new client");
  while(!client.available())
  {
    delay(1);
    waitCounter++;

    if (waitCounter > 100)
    {
      client.flush();
      return;
    }
  }

  // Read the first line of the request
  String request = client.readStringUntil('\r');
  client.flush();

  processRequest(request);

  // Return the response
  client.println("HTTP/1.1 200 OK");
  client.println("Content-Type: text/html");
  client.println(""); //  do not forget this one
  client.println("<!DOCTYPE HTML>");
  client.println("<html>");

  client.println("<br><br>");
  client.println("<a href=\"/button=red\"\"><button style=\"background-color:red\">Red </button></a>");
  client.println("<a href=\"/button=green\"\"><button style=\"background-color:green\">Green </button></a><br />");

  client.print("<br><br>RGM version:");
  client.println(VERSION);

  client.print("<br>Red files count:");
  client.println(redFileCount);

  client.print("<br>Green files count:");
  client.println(greenFileCount);

  client.print("<br>Actual volume is now:");
  client.println(mp3Volume);

  client.println("<br><br>");
  client.println("button=Green - plays random green sfx");
  client.println("<br>playGreen=1 - plays green sfx with index 1");

  client.println("</html>");

  delay(1);
  Serial.println("Client disonnected");
  Serial.println("");
}

// Process web request and process commands
void processRequest(String request)
{
  Serial.print("Process request:");
  Serial.println(request);

  // Match the request
  if (request.indexOf("/button=red") != -1)
  {
    Serial.println("Red button sended");

    playRandom(RED_FOLDER_NUMBER, redFileCount);
  }
  else if (request.indexOf("/button=green") != -1)
  {
    Serial.println("Green button sended");

    playRandom(GREEN_FOLDER_NUMBER, greenFileCount);
  }
  else if (request.indexOf("/playRed=") != -1)
  {
    int index = request.indexOf("=");
    String fileNumberString = request.substring(index + 1);
    int fileNumber = fileNumberString.toInt();
    if (fileNumber >= redFileCount)
    {
      fileNumber = redFileCount - 1;//use last as default
    }

    playFileIndex(RED_FOLDER_NUMBER, fileNumber);
  }
  else if (request.indexOf("/playGreen=") != -1)
  {
    int index = request.indexOf("=");
    String fileNumberString = request.substring(index + 1);
    int fileNumber = fileNumberString.toInt();
    if (fileNumber >= greenFileCount)
    {
      fileNumber = redFileCount - 1;//use last as default
    }

    playFileIndex(GREEN_FOLDER_NUMBER, fileNumber);
  }

  //volume settings
  int volumeIndex = request.indexOf("/volume=");
  if (volumeIndex != -1)
  {
    String volumeString = request.substring(volumeIndex + 8);
    int newVolume = volumeString.toInt();

    if (newVolume > 0 && newVolume <= 30)
    {
      mp3Volume = newVolume;

      Serial.print("Change volume to:");
      Serial.println(mp3Volume);

      mp3_set_volume(mp3Volume);
    }
  }
}

// Play random file in selected folder and range
void playRandom(int folderNumber, int fileCount)
{
  int randomFileIndex = random(fileCount);
  playFileIndex(folderNumber, randomFileIndex);
}

// Play selected file in selected folder
void playFileIndex(int folderNumber, int fileIndex)
{
  mp3_stop();
  mp3_play_file_in_folder(folderNumber, fileIndex);
}
7. Kontrola funkčnosti
Před zakrytováním zkontrolujeme funkčnost tlačítek a reproduktoru. Případný problém najdeme a odstraníme.
Krabičku zašroubujeme a nezapomeneme na plastové nožičky.

Připojíme ke zdroji a počkáme až naběhne. V zápětí vyzkoušíme obě tlačítka. Pro zkoušku webového rozhraní budeme potřebovat zjisti IP adresu RedGreenMachine. Tu zjistíme pomocí AdvancedIPScanner nebo Fing. Najdeme ji také v konzoli po připojení k wifi.

Napsat komentář